KatAM:Mixing: Difference between revisions
(Page Creation) |
CorvusScribe (talk | contribs) (all graphics and descriptions added) |
||
| (9 intermediate revisions by 2 users not shown) | |||
| Line 1: | Line 1: | ||
{{DISPLAYTITLE:Mixing}} | {{DISPLAYTITLE:Mixing}} | ||
=About Mixing= | =About Mixing= | ||
When inhaling two enemies with abilities, a mix will be preformed upon swallowing them. The starting position of the roulette | When inhaling two enemies with abilities, a mix will be preformed upon swallowing them. The starting position of the roulette depends on the first enemy you inhale. [[Mix#Retro and GBA/DS|Methods]] for landing a mix vary from person to person: some involve counting the audible ticks in your head, looking for a certain ability on the roulette, or counting in a specific rhythm. The order of abilities is shown below: | ||
[[File:KatamMix.png]] | [[File:KatamMix.png]] | ||
= Mixes for all categories = | |||
=== Tutorial Wheel Mix === | |||
{| class="mw-collapsible mw-collapsed wikitable" | |||
! colspan="1" |Tutorial Wheel Mix Setup | |||
|- | |||
| https://media.giphy.com/media/MTOYdXIMJVEuB40CPC/giphy.gif | |||
|} | |||
[[File:Tutorial Mix.png]] | |||
For this mix, '''Wheel''' is in the 17th slot in the roulette. Setting up Wheel Mix is not very difficult however getting wheel is a 4 frame window right in the middle of the mix. This trick takes a long time to develop the right muscle memory. In order to time it properly, you can try counting 3 and a half beats to the rhythm of the music. If you miss the mix, you can reset the room by entering and exiting the door. If the AI Kirbys get in your way, just exit the room and call them back out. | |||
Doing this mix saves over 40 seconds compared to doing movement without '''[[Any/1#King Golem without Wheel Mix|Wheel]]'''. | |||
===Gobbler (UFO) Mix=== | |||
{| class="mw-collapsible mw-collapsed wikitable" | |||
! colspan="1" |Gobbler Mix Setup | |||
|- | |||
|https://cdn.discordapp.com/attachments/1127359625465974825/1127716400857886730/ufomixgif.gif | |||
|} | |||
[[File:Gobbler UFO Mix.png]] | |||
For this mix, '''UFO''' is in the 13th slot in the roulette, and '''Fire''' in the 14th. Setting up for this mix more difficult compared to Wheel Mix, however it is easier to time. A successful mix will either result in '''UFO''' or '''Fire''', which means the mix has an 8 frame window. You then use '''UFO''' or '''Fire''' to break the bomb block that is usually unreachable for the player, which skips navigating around a large room. | |||
Doing this mix saves over 5 seconds compared to an optimal [[Any/5|Sword Skip]]. | |||
== | ===Dark Mind UFO Mix=== | ||
[[File:Dark Mind UFO Mix.png]] | |||
For this mix, '''UFO''' is in the 19th slot in the roulette. In order to initiate a mix, you will need to inhale a green star. The roulette slows down the moment it reaches throw, which makes timing for '''UFO''' easier. Since the frame window is over 4 frames, you can pause buffer during the mix and wait for '''UFO''' to appear meaning you should land the mix so long as you pause buffer fast enough. | |||
[[File:Pletty Mixes.png]] | |||
<youtube>IXlitpCvoKY</youtube> | |||
If you inhale two stars simultaneously, you can also perform alternative mixes. The roulette differs depending on what color star you inhale first. The setups for these mixes vary depending on Dark Mind's attack pattern. | |||
*Inhaling a blue star causes '''UFO''' to appear in the 20th slot in the roulette. | |||
*Inhaling a red star causes '''UFO''' to appear in the 21st slot in the roulette. | |||
*Inhaling a purple star causes '''UFO''' to appear in the 6th slot in the roulette. | |||
Doing this mix saves over 20 seconds compared to fighting Phase 5 of Dark Mind with '''Master'''. | |||
=Any% Mixes = | |||
== | ===Gobbler Wheel Mix=== | ||
{| class="mw-collapsible mw-collapsed wikitable" | |||
! colspan="1" |Gobbler Wheel Mix Setup | |||
|- | |||
|[[File:Gobbler Wheel Mix Setup.gif|240x240px]] | |||
|} | |||
[[File:Gobbler Wheel Mix.png]] | |||
While not easy to set up, this mix is easy to time as '''Wheel''' is the first obtainable ability in the roulette. If timed correctly, mashing or double-tapping will consistently grant you the '''Wheel''' ability. If you miss the initial timing however, '''Wheel''' will reappear in the 26th slot. In an optimized 100% run, you can also use this mix to obtain '''UFO''', which appears in the 13th slot in the roulette. | |||
Doing this mix saves around 6 seconds compared to obtaining '''Wheel''' in Rainbow Route. | |||
===Wiz Wheel Mix=== | |||
{| class="mw-collapsible mw-collapsed wikitable" | |||
! colspan="1" |Wiz Wheel Mix Setup | |||
|- | |||
|[[File:Wiz Wheel Mix Setup.gif]] | |||
|} | |||
[[File:Wiz Wheel Mix alt.png]] | |||
[[File:Wiz Wheel Mix.png]] | |||
For this mix, '''Wheel''' appears in the first obtainable slot in the roulette if setup correctly. This mix is moderately difficult, however it can be consistent with practice. While tighter, it's preferable to try and inhale the Foley before the Sir Kibble in order to get the ideal mix roulette. Otherwise, if you're late and inhale Sir Kibble before the Foley, '''Wheel''' will appear in the 5th slot in the roulette. The timing for the latter mix coincides with the rhythm of the music, so you can press down on one beat and stop the roulette on the next. | |||
Doing this mix saves around 3 seconds compared to obtaining '''Wheel''' in Rainbow Route. | |||
===Wiz Hammer Mix=== | |||
{| class="mw-collapsible mw-collapsed wikitable" | |||
! colspan="1" |Wiz Hammer Mix Setup | |||
|- | |||
|[[File:Wiz Hammer.gif]] | |||
|} | |||
[[File:Gobbler Hammer Mix.png]] | |||
For this mix, '''Hammer''' appears in the 16th slot in the roulette. Alternatively, '''Throw''' appears in the 6th slot. Missing '''Hammer''' by a slot will land you on '''Parasol''' instead. | |||
The setup for this mix is inconsistent and tight, and depends on the state of the Sparky you're inhaling. You want to inhale immediately (usually a frame) after you jump in order to inhale both enemies. | |||
*If the Sparky is stationary, the setup is impossible and you need to wait. | |||
*If the Sparky jumps, the timing window for inhaling both enemies can go up to 3 frames. | |||
*If the Sparky attacks, the timing window for inhaling both enemies is a single frame. Additionally, the Sparky can only be inhaled if it has an active spark hitbox surrounding it, making the success rate effectively 50%. | |||
Doing this mix can save several seconds compared to fighting Wiz with '''Parasol'''. | |||
=100% Mixes= | =100% Mixes= | ||
===Mustard Missile Mix=== | |||
{| class="mw-collapsible mw-collapsed wikitable" | |||
! colspan="1" |Mustard Missile Mix Setup | |||
|- | |||
|[[File:Mustard Missile Mix Setup.png]] | |||
|} | |||
[[File:Mustard Missile Mix.png]] | |||
Slide into the first Sparky in order to set the mix up. After the initial setup, no timing is necessary as '''Missile''' is the very last ability in the roulette. If optimized however, '''Missile''' will appear in the 5th slot. | |||
===Mustard Wheel Mix=== | |||
{| class="mw-collapsible mw-collapsed wikitable" | |||
! colspan="1" |Mustard Wheel Mix Setup | |||
|- | |||
|[[File:Mustard Wheel Mix Setup.gif]] | |||
|} | |||
[[File:Mustard Wheel Mix.png]] | |||
After the initial setup, no timing is necessary as '''Wheel''' is the very last ability in the roulette. If optimized however, '''Wheel''' will appear in the 5th slot. This mix can also be used in the All Sprays category. | |||
===Mustard UFO Mix=== | |||
{| class="mw-collapsible mw-collapsed wikitable" | |||
! colspan="1" |Mustard UFO Mix Setup | |||
|- | |||
|[[File:Mustard UFO mix.gif]] | |||
|} | |||
[[File:Mustard UFO Mix.png]] | |||
Pay attention to the Sparky's behavior during the setup. '''UFO''' appears in the 7th slot in the roulette. If you don't get it the first time, you can come back later and try the mix again. | |||
===Moonlight Wheel Mix=== | |||
{| class="mw-collapsible mw-collapsed wikitable" | |||
! colspan="1" |Moonlight Wheel Mix Setup | |||
|- | |||
|[[File:Moonlight Wheel Mix Setup.gif]] | |||
|} | |||
[[File:Moonlight Wheel Mix.png]] | |||
Pay attention to the Waddle Doo behaviors during the setup. '''Wheel''' appears in the 4th slot in the roulette, however it can also appear in the 28th slot. This mix is also used in the All Sprays category. | |||
== | ===Peppermint Hammer Mix=== | ||
{| class="mw-collapsible mw-collapsed wikitable" | |||
! colspan="1" |Peppermint Hammer Mix Setup | |||
|- | |||
|[[File:Wiz Hammer 100.gif]] | |||
|} | |||
[[File:Wiz Hammer Mix 100.png]] | |||
The setup for this mix is tighter than it seems, however is consistent with practice. '''Hammer''' is the first obtainable ability in the roulette. If timed correctly, mashing or double-tapping will consistently grant you the '''Hammer''' ability. If you miss the initial timing however, '''Hammer''' will reappear in the 26th slot. If you inhale Laser Ball before Parasol, '''Stone''' will appear in the first obtainable slot instead, followed by '''Smash'''. Both of these can be used. | |||
=Other Mixes= | |||
== | ===Co-op Wheel Mix=== | ||
{| class="mw-collapsible mw-collapsed wikitable" | |||
! colspan="1" |Co-op Wheel Mix Setup | |||
|- | |||
|[[File:Coop Wheel Mix Setup.png]] | |||
|} | |||
[[File:Co-op Wheel Mix.png]] | |||
'''Wheel''' appears in the 3rd slot in the roulette. It can also be used as a backup mix, among many other mix opportunities in Candy Constellation. | |||
Latest revision as of 05:00, 21 January 2024
About Mixing
When inhaling two enemies with abilities, a mix will be preformed upon swallowing them. The starting position of the roulette depends on the first enemy you inhale. Methods for landing a mix vary from person to person: some involve counting the audible ticks in your head, looking for a certain ability on the roulette, or counting in a specific rhythm. The order of abilities is shown below:
Mixes for all categories
Tutorial Wheel Mix
| Tutorial Wheel Mix Setup |
|---|

|
For this mix, Wheel is in the 17th slot in the roulette. Setting up Wheel Mix is not very difficult however getting wheel is a 4 frame window right in the middle of the mix. This trick takes a long time to develop the right muscle memory. In order to time it properly, you can try counting 3 and a half beats to the rhythm of the music. If you miss the mix, you can reset the room by entering and exiting the door. If the AI Kirbys get in your way, just exit the room and call them back out.
Doing this mix saves over 40 seconds compared to doing movement without Wheel.
Gobbler (UFO) Mix
| Gobbler Mix Setup |
|---|

|
For this mix, UFO is in the 13th slot in the roulette, and Fire in the 14th. Setting up for this mix more difficult compared to Wheel Mix, however it is easier to time. A successful mix will either result in UFO or Fire, which means the mix has an 8 frame window. You then use UFO or Fire to break the bomb block that is usually unreachable for the player, which skips navigating around a large room.
Doing this mix saves over 5 seconds compared to an optimal Sword Skip.
Dark Mind UFO Mix
For this mix, UFO is in the 19th slot in the roulette. In order to initiate a mix, you will need to inhale a green star. The roulette slows down the moment it reaches throw, which makes timing for UFO easier. Since the frame window is over 4 frames, you can pause buffer during the mix and wait for UFO to appear meaning you should land the mix so long as you pause buffer fast enough.
If you inhale two stars simultaneously, you can also perform alternative mixes. The roulette differs depending on what color star you inhale first. The setups for these mixes vary depending on Dark Mind's attack pattern.
- Inhaling a blue star causes UFO to appear in the 20th slot in the roulette.
- Inhaling a red star causes UFO to appear in the 21st slot in the roulette.
- Inhaling a purple star causes UFO to appear in the 6th slot in the roulette.
Doing this mix saves over 20 seconds compared to fighting Phase 5 of Dark Mind with Master.
Any% Mixes
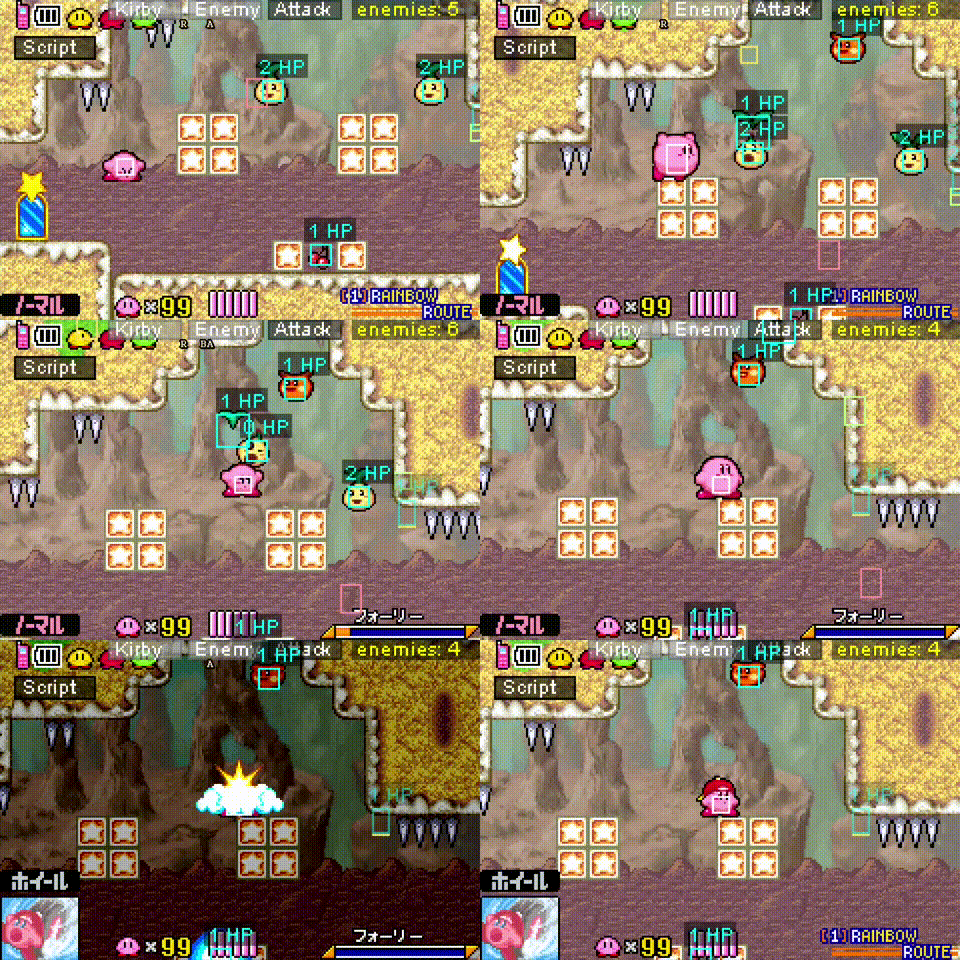
Gobbler Wheel Mix
| Gobbler Wheel Mix Setup |
|---|
|
While not easy to set up, this mix is easy to time as Wheel is the first obtainable ability in the roulette. If timed correctly, mashing or double-tapping will consistently grant you the Wheel ability. If you miss the initial timing however, Wheel will reappear in the 26th slot. In an optimized 100% run, you can also use this mix to obtain UFO, which appears in the 13th slot in the roulette.
Doing this mix saves around 6 seconds compared to obtaining Wheel in Rainbow Route.
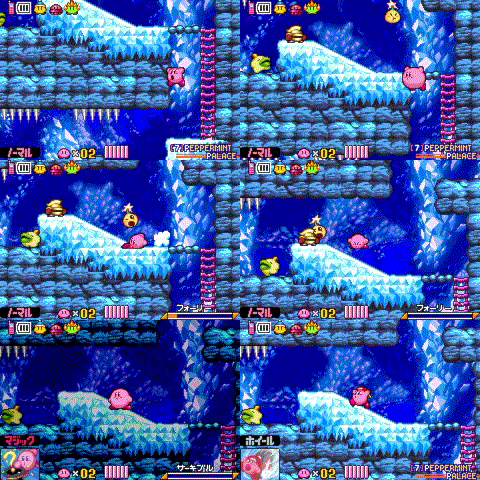
Wiz Wheel Mix
| Wiz Wheel Mix Setup |
|---|
|
For this mix, Wheel appears in the first obtainable slot in the roulette if setup correctly. This mix is moderately difficult, however it can be consistent with practice. While tighter, it's preferable to try and inhale the Foley before the Sir Kibble in order to get the ideal mix roulette. Otherwise, if you're late and inhale Sir Kibble before the Foley, Wheel will appear in the 5th slot in the roulette. The timing for the latter mix coincides with the rhythm of the music, so you can press down on one beat and stop the roulette on the next.
Doing this mix saves around 3 seconds compared to obtaining Wheel in Rainbow Route.
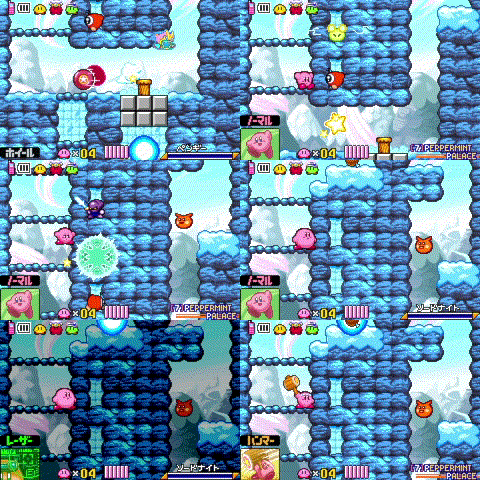
Wiz Hammer Mix
| Wiz Hammer Mix Setup |
|---|
|
For this mix, Hammer appears in the 16th slot in the roulette. Alternatively, Throw appears in the 6th slot. Missing Hammer by a slot will land you on Parasol instead.
The setup for this mix is inconsistent and tight, and depends on the state of the Sparky you're inhaling. You want to inhale immediately (usually a frame) after you jump in order to inhale both enemies.
- If the Sparky is stationary, the setup is impossible and you need to wait.
- If the Sparky jumps, the timing window for inhaling both enemies can go up to 3 frames.
- If the Sparky attacks, the timing window for inhaling both enemies is a single frame. Additionally, the Sparky can only be inhaled if it has an active spark hitbox surrounding it, making the success rate effectively 50%.
Doing this mix can save several seconds compared to fighting Wiz with Parasol.
100% Mixes
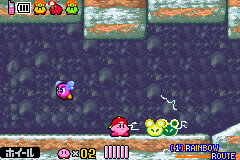
Mustard Missile Mix
| Mustard Missile Mix Setup |
|---|
|
Slide into the first Sparky in order to set the mix up. After the initial setup, no timing is necessary as Missile is the very last ability in the roulette. If optimized however, Missile will appear in the 5th slot.
Mustard Wheel Mix
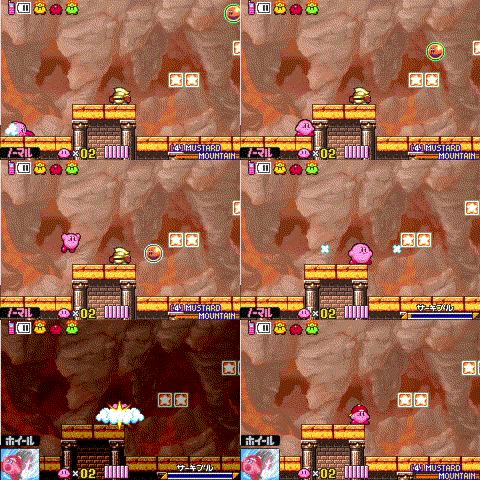
| Mustard Wheel Mix Setup |
|---|
|
After the initial setup, no timing is necessary as Wheel is the very last ability in the roulette. If optimized however, Wheel will appear in the 5th slot. This mix can also be used in the All Sprays category.
Mustard UFO Mix
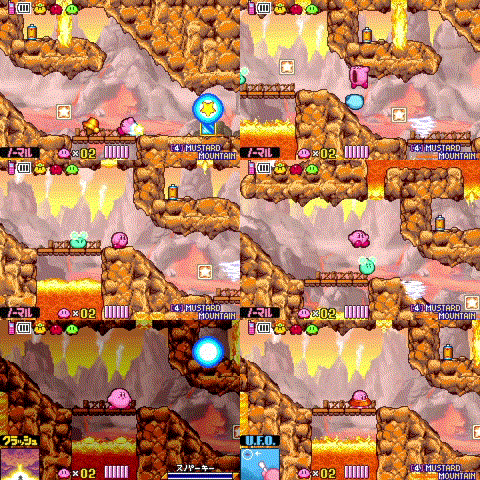
| Mustard UFO Mix Setup |
|---|
|
Pay attention to the Sparky's behavior during the setup. UFO appears in the 7th slot in the roulette. If you don't get it the first time, you can come back later and try the mix again.
Moonlight Wheel Mix
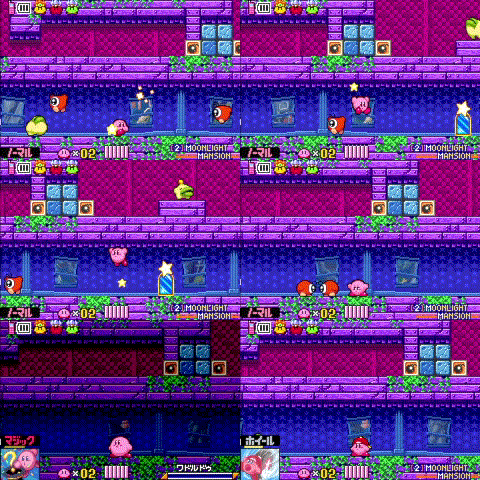
| Moonlight Wheel Mix Setup |
|---|
|
Pay attention to the Waddle Doo behaviors during the setup. Wheel appears in the 4th slot in the roulette, however it can also appear in the 28th slot. This mix is also used in the All Sprays category.
Peppermint Hammer Mix
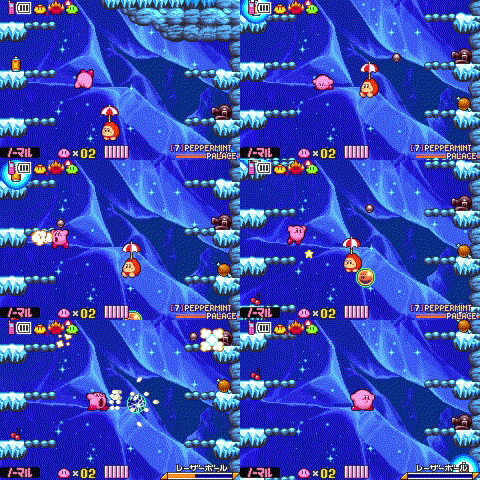
| Peppermint Hammer Mix Setup |
|---|
|
The setup for this mix is tighter than it seems, however is consistent with practice. Hammer is the first obtainable ability in the roulette. If timed correctly, mashing or double-tapping will consistently grant you the Hammer ability. If you miss the initial timing however, Hammer will reappear in the 26th slot. If you inhale Laser Ball before Parasol, Stone will appear in the first obtainable slot instead, followed by Smash. Both of these can be used.
Other Mixes
Co-op Wheel Mix
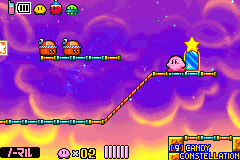
| Co-op Wheel Mix Setup |
|---|
|
Wheel appears in the 3rd slot in the roulette. It can also be used as a backup mix, among many other mix opportunities in Candy Constellation.

